Category Archives: card

Octopus card

JohnOctopusSml

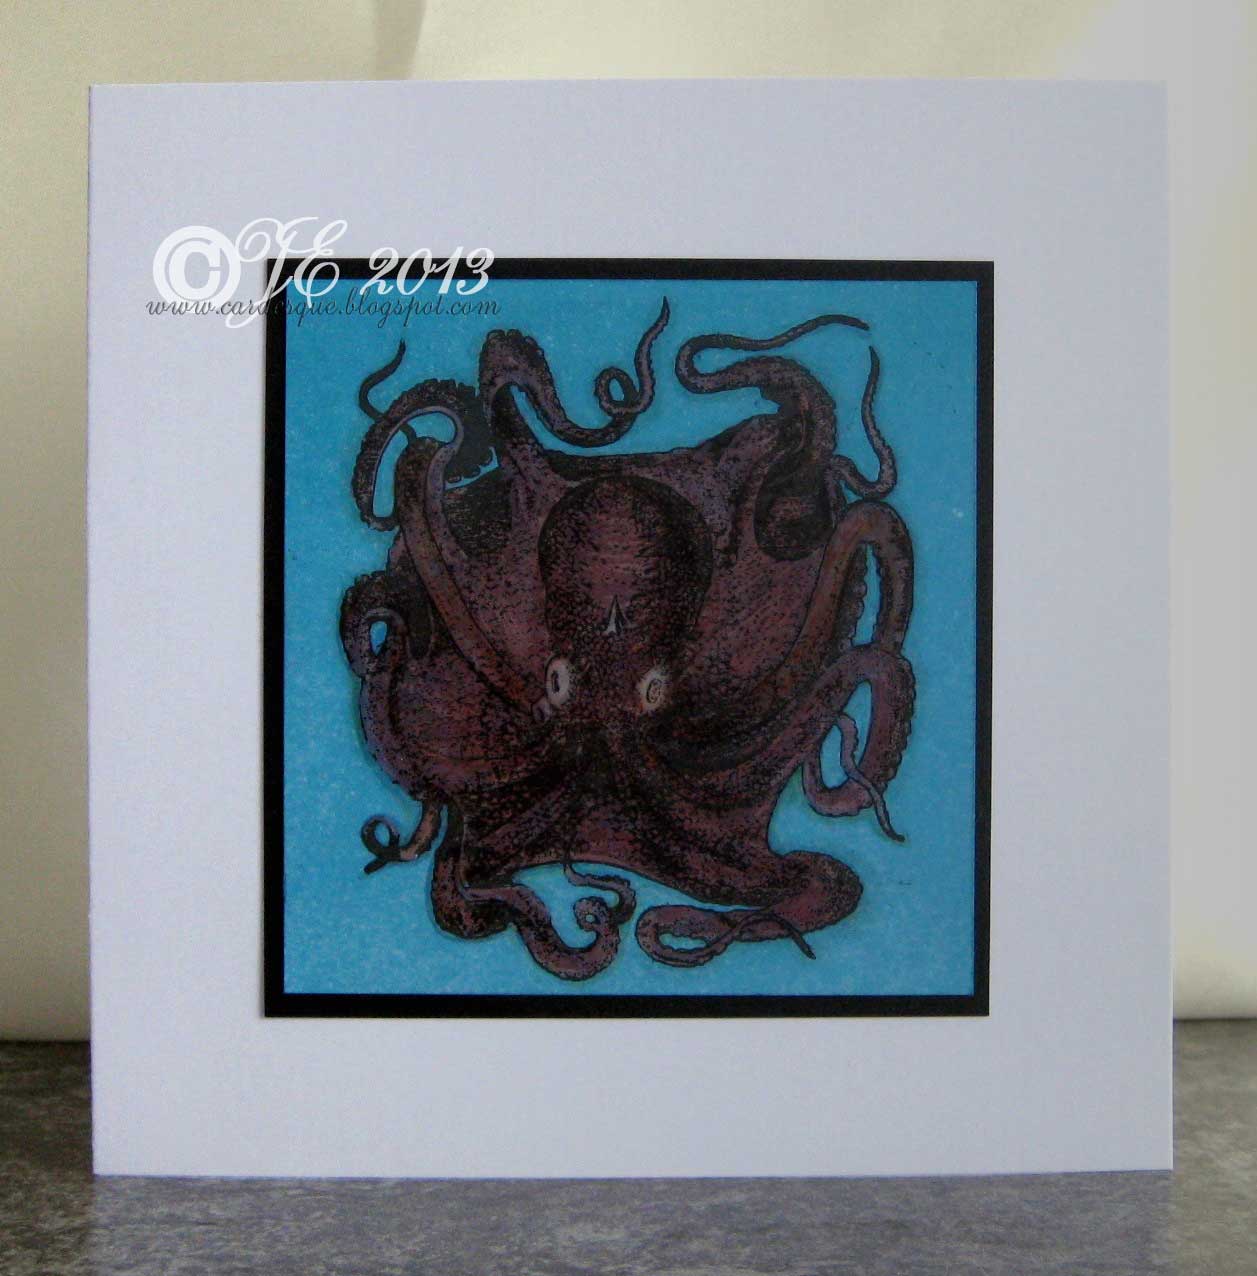
An octopus may not be the first idea you have when making a card for someone but John has mentioned them a few times when regaling us with stories from his holidays in Greece. This one is an Oxford Impressions stamp from The Deep set.   I brayered the background blue onto silk matt coated card then sprayed with water and sprinkled with salt to get a speckled effect. The image was stamped using black memento ink then using a water brush filled with bleach I took some of the colour out so I could then go back in and use a pinky colour for the octopus.  I used a variety of copics and other pens but couldn’t quite get the blended effect I was after.

Steampunk cards

steampunkCardJ2013Sml
steampunkCardS2013Sml
I was in a bit of a hurry the other day to get a couple more cards finished.  I wanted to do a couple of steampunk cards but not in the usual brown/sepia colour so I chose black, white and grey.  The grey colour in real life is more of a warm grey than you see here.  There is a bit of masking, layering and brayering going on here and some small details are highlighted with silver liquid pearl.  The stamps are Oxford Impressions Steampunk and Stampin up (cogs in bottom pic).

Napkin card

napkinMusicCardSml

This was a fun card to do but it didn’t turn out quite as I had expected it to.  Tegan likes this kind of scrapbook/journal type of thing and I found the perfect napkin in my stash for it. It feels like a bit of a cheat really as the artwork is all from the napkin.  I made a base first from a music print along with some acrylic paint and soft gel then I glued the top layer of a (3 ply)  tissue napkin over it.  The intention was to see some of the music print through the tissue napkin but it is quite faint.  If you click on the image you might just see it.  I layered it up with some red vellum and added a punched out red vellum butterfly with some lemon yellow liquid pearl for the body.  Lastly I added diamond glaze to the button.

Copper Christmas tree card

 copperTreeSml
copperTreesSpklSml

In an attempt at using some of my stash up and inspired by one of my copper baubles I made this simple Christmas tree card.  I don’t use my copper Stazon ink very often and I want to use it more before it dries up in the bottle (it is the type that you need to re-ink the pad each time to get it out to use) and I have had the copper stars ribbon in my stash for years now and my copper stickles have gone a bit dry and gloopy.  They all need to be used up.  The photos don’t really show how glittery it actually is.
I smooshed  some Distress inks onto a craft sheet then sprayed with water then I placed a piece of white card onto it.  Once it was dry I stamped the image using the copper Stazon.  I tried to remove some of the colour from the tree and gift using some bleach but it didn’t work as well as I expected to and when that was all dry I scribbled a glitter gel pen over the tree and gift and blended  it using a water brush to cover the image.  I edged the layers using the Stazon as well.  The ribbon has very glittery stars and lines on it and then lastly I added blobs of copper stickles (mine has gone rather thick now therefore it came out of the nozzles rather stringy and wouldn’t stick to the card very well) – so I have learnt my lesson – use my stash up before I can’t use it all all.

Zentangle Chrismas card

zentangleChristmasSml

For this zentangle card I used masking tape to make a white border and didn’t add a black line border around it in order to keep it quite light.  I am not sure it worked as you can see the lines at the top going off into nowhere.  I got all my Christmas papers and stamps out but ended up doodling this one and not using up any of my stash.  I just haven’t got my Christmas mojo this year so I will only be making a few cards.  I used a gel glitter pen to add sparkle on the snowy areas – you can see it better bellow.

zentangleChristmasSpklSml

Bright and colourful grungy birthday card

Grace2012Sml

Inspired by Craft stamper again but can’t remember the issues, I used a mixture of techniques.  Using an A5 piece of old card I started making the background using torn masking tape along with some ripped pieces of text from an old book sticking them haphazardly over the whole piece of card.Then I applied some Distress inks to the page  (tiny drops from re-inkers)  and smooshed it around with a baby wipe so that some of the ink highlighted the edges of the tears.  I gave it a light spray with water and while it was still wet I sprinkled on some salt in some areas.  Once dry the salt was then wiped off.  Using various found items I made some marks with black and white acrylic paint and stamped some text using white acrylic paint (I tried various white inks but none of them came out well).
Next I stamped the silhouette onto tissue paper and stuck that onto my card.  Stamped more white text over the image and highlighted areas with oil pastels.  Cut the size you need then mat and layer it all on the card.  Similar background card was created with ordinary white card as one of the layers.

Inks:  Memento Tuxedo black, Distress re-inkers Picked raspberry, Moved lawn and Salty ocean
Card: white and black
Stamps:  Dina Wakely grungy silhouette D1007
Other:  black and white acrylic paint, oil pastels, torn book pages, masking tape

Autumn anniversary card

 autumnAnniversarySml

I really liked the look of  Michelle Zindorf’s card she made in one of her tutorials  #543 so I wanted to make my version for my mum and dad’s anniversary.  As usual I have tweaked a few bits to make it a little different but keeping to her overall design. The grungier type of swirls go better with this very rustic grungy type of image. The direct to paper technique makes every card look different as you can never swipe the inks pads identically.

Inks:  Stampin up Soft suede and Crumb cake, Adirondack Espresso
Card: ivory, dark green, pearlised brown and dark brown card
Stamps:  Stampin up Lovely as a tree and Cheer and wishes, Creative expressions Swirl elements, Tim Holtz Urban tapestry (texture stamp)
Other: copper peel-off leaf (darkened with brown Sharpie pen to dull the copper), Tombow green pen, Moonshadow ink Incandescent copper, copper brads
I did use a white pen to create highlights but I smudged them in a little as they were just too bright.

Brayered fairy birthday card

Erin2012Sml
Erin2012cropSml
Erin has a fairy sitting on a crescent moon tattoo and although it is not exactly the same as this stamp I thought it would make a nice card for her.  From the front the moon just looks a bit grey but just turning the card ever so slightly at an angle shows the lovely pearly moon and some of the glitter or should I say fairy dust. I brayered both red and purple at the top of the card but mostly purple as I got to the bottom left corner and I added some feathery lines to her dress to give her a more floaty feel.
Inks:  Adirondack Cranberry and Wild plum, Stampin up Ruby red, Memento Tuxedo black
Card: silk matte coated card, large aperture card
Stamps:  Lavinia silhouette leaves and flowers, fairy and moon stamp (unknown)
Other:  stickles, black glitter, black pen, copics, Pearlex Macropearl, mini mosaics


Stampotique birthday card

carey2012sml

This card was inspired by the Craftstamper mag. but it is an amalgamation of a few ideas all of which I have used in various art journal pages but not usually in my cards.  I used acrylic paper as I wanted it to look a bit like canvas but I had to be careful with swiping it with baby wipes as the surface disintegrates.  I maybe should have given it a thin wash of gesso first.
Only one Candle Carey 😉

Inks:  Black India ink, inktense pencils to colour image, copic pen for skin (not good with the India ink though), Acrylic paints: Black, Lime, Moss, Turquoise and White
Card:  acrylic card, white card, turquoise card
Stamps:  Stampotique Karen, Cute companions Patchwork number set 2 (little cup cake), computer generated text
Other:  black pen